Introduction to Bash
Course Homepage
April 2019
This project is maintained by UofABioinformaticsHub
- Introducing Bash
Introducing Bash
Background
Command-line tools are the mainstay of analysis for large (biological or non-biological) data sets. Good candidate examples for command-line analyses in bioinformatics are:
- manual inspection of FASTQ, BAM and SAM files from NGS pipelines
- automating analyses across multiple datasets/experiments
- manipulations of data which are repetitive or laborious to perform manually
- job submission to HPC clusters
- the list goes on and on…
Today we’ll explore a few commands to help you gain a little familiarity with some important ones, and to enable you to find help when you’re working by yourself. We don’t expect you to remember all the commands and options from today. The important thing is to become familiar with the basic syntax for commands, how to put them together, and where to look for help when you’re unsure.
Why should you learn the basics
While some people feel more comfortable with a graphical user interface (GUI) than with issuing textual commands to a computer, you should think of command-line interfaces as an extra tool in the tool box that can be used in conjunction with a GUI. There are tasks that are more suited and easier to complete using the GUI. However, many tasks (especially in the field of bioinformatics) are more easily and reliably performed using the command-line, and are sometimes only available through this interface.
The command-line may feel more like programming than using a mouse but in essence its almost the same thing. Some advantages of using the command-line over the GUI are;
- rich set of inbuilt tools
- ability to combine tools into powerful pipelines and to easily handle large volumes of data
- reproducibility and sharing of workflows
- easiest way to interact with remote PC’s and supercomputers
Unfortunately it also comes with a few disadvantages;
- primarily textual in nature
- steep learning curve
Learning even just the basic bash commands will open up new avenues of exploration in any data science project you might tackle. And, may even get you over the line on that new job application … What have you got to lose?
Initial Goals
- Gain familiarity and confidence within the
bashenvironment - Learn how to navigate directories, as well as to copy, move and delete the files within them
- Look up the help page of a command needed to perform a specified task
What is bash and the command-line?
The command-line is a textual interface to allow interaction between the user and the computer.
The interface allows the user to issue commands at a physical or virtual terminal to a program called a shell program that then runs those commands either as directly or by starting another program that are installed on the computer.
We’ll explore a few of these commands today.
There are many different shells, but a commonly used shell is the “Bourne-again Shell”, or bash.
The original shell, sh, was created by Stephen Bourne at Bell Labs in the 1970’s, and this updated version was initially released in 1989 as a security update and hilarious joke.
Commands can be issued by a user after the shell prints a prompt to the terminal.
If you’ve ever heard of the phrase shell scripts, this refers to a series of these commands strung together into a text file, which is then able to be executed as a single command.
Without further ado,
Meet the prompt
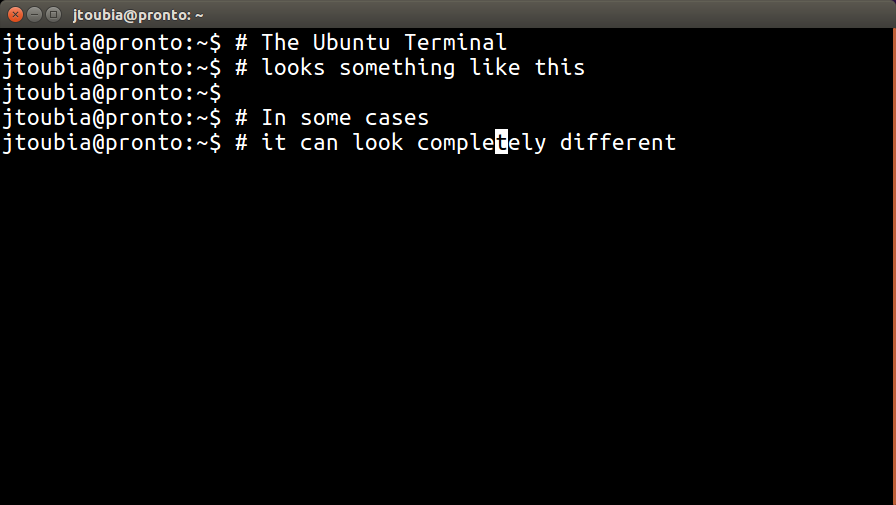
Firstly we need to make sure we have an open terminal as we did during the set-up steps. The terminal interface may look different as you browse around the room. Here is an example of what it usually looks like in a Linux environment.
Figure 1. The Terminal
In bash you will have this $ sign at the start of each line where you can enter a command.
This character and any associated text is called the “prompt”, which may tell you something about your user name, the current directory (also known as a “folder” in the point-and-click world) you are in, your remote computer’s name and other things that can be set.
Because of this ability to manually customise the prompt, it may look different between computers that share the exact same operating system, and even between users on the same machine.
The main point here is that all the bash commands you’ll use in this workshop should be typed after the $ where you should see a cursor flashing.
Sometimes command examples you see on the Internet (and maybe even here) start with this $ followed by a code example.
If you see this you can ignore it as this is just indicating where your command should begin, and there is no need to type it.
The prompt is there to indicate that the shell is waiting for a task/instruction. The user defines the task by using the keyboard and typing in commands. The shell then evaluates the command, processes and returns the output. Following this the shell provides a new prompt and is ready to do it all over again. The whole process is often referred to as REPL (read - evaluate - print - loop)
Lets try it with some simple commands. Type the command ls in the terminal, followed by the Enter key to complete the command.
ls
The command ls stands for listing as the name implies, lists the contents of a directory.
(More to come on this!)
ls is possibly one of the most used commands on the command-line and we will use it often throughout this workshop.
We are more used to seeing this in our conventional graphical view with directory and files showing as clear icons, but once you’ve used bash for a while you may find yourself preferring this view.
Many bioinformaticians do in fact prefer this as it can be much faster to move around than clicking your way through.
A Handy Tip:
The shell also keeps a record of command you have entered in a history that can be traversed by using the up and down arrow keys. You may not have much in there yet but try it out and make use of it as much as you can, it’s a massive time saver. You also have the ability to modify and rerun any command stored in history by moving the cursor left or right with the arrow keys and deleting and/or adding appropriate text.
Are you lost? Orientation in bash
Type the command pwd in the terminal and you will see the output which describes the home directory for your login (in most cases!).
pwd
The command pwd is what we use to print the working directory (the directory that you currently reside in).
This directory you are currently in (we hope), is usually referred to as your home directory.
This is also the information that the tilde represents as a shorthand version, so whenever you see the tilde in a directory path, or in your prompt, it is interpreted as home directory.
Know your file system!
To gain a better understanding of the concept your home directory, we first need to know how the file system as a whole is configured.
On most modern OS’s the file system is laid out in a hierarchical manner.
Files and directories are housed in other directories which in turn (with other files) are also housed in directories and so on all the way to the top directory which houses everything.
This all-encompassing top level directory is commonly referred to as root and is represented in Linux-based systems by the lone forward slash /.
Windows users would be more familiar with seeing C:\ as the root of the file system, and this is a very important difference in the two directory structures.
Note also that whilst Windows uses the backslash (\) to indicate a new directory, a Linux-based system uses the forward slash (/) to separate directories, or more commonly just referred to simply as “slash”.
Figure 2. Typical file system hierarchy
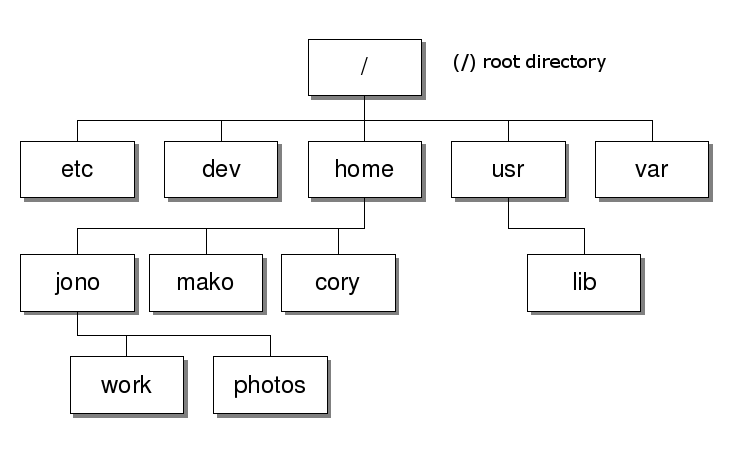
Here’s a depiction of the Linux file system.
Obviously, there is a lot missing in the above figure.
The home directory (jono) for the user Jono is housed within the home directory which itself is housed within the root directory.
This does confuse a few people, but once you realise that the /home directory is where the set of home directories are placed for all users, this makes a little more sense.
All users have their own home directory and that will live here.
For Jono, the path all the way from the top is thus “root–>home –>jono or in command-line terms /home/jono.
For any other users (such as Cathy), this would be /home/cathy
Note: the forward slash was used to delimit (i.e. separate) the individual directory names as well as indicating the root of the file system.
Note: Spaces are highly important on the command line, so take note of them wherever they appear in the given commands. Best practice is to never use spaces when naming directories or files.
Task
Lets diverge a bit and do a small group exercise. Open a GUI file/directory browser on your machine and click through a few directories. Whilst you are exploring pay attention to the horizontal navigation bar that tells you where you are. As you move around try and get a feel for how a path is built.
Changing Directories (cd)
In this section we will learn how to change directories using bash.
Try to mirror this using your conventional GUI approach so you can understand what’s actually happening.
With your GUI based file/directory browser, navigate to the directory indicated by the pwd command.
Now let’s go the other way, navigate to a random spot on your machine using the GUI and then try to get to that same spot in the terminal
The built-in command which we use to change directory is cd. For example, If I want to get to a directory located at root–>home–>johnny–>workshop1, I could do this
cd /
cd home
cd trainee
We can also move through multiple directories in one command by separating the directory and file names with the forward slash “/”. For example, we could also get to the same directory by typing this
cd /home/trainee
No matter where we are in a file system (except at the root), we can move up a directory (i.e. one step towards the root) by using the command
cd .. # Change directory to the parent.
NB: The space between the cd and .. is important and the hash character on this line is special too. Why?
The filename .. is the name of the parent directory, one directory above, while a single dot . is the current directory.
Enter the above command and notice that the location immediately to the left of the $ has now changed. This is also what will be given as the output if we entered the command pwd again.
If we continue to enter
cd ..
enough times we should end up in the root directory of the file system, at which point we can go no further.
Try it and print the working directory again (pwd). The output should be the root directory given as /.
We can change back to our home directory from anywhere by entering one of:
cd ~
or even just
cd
This has introduced an important shortcut (~) which contains the address for your home directory (/home/trainee).

(Why is the your home directory represented by ~?)
We can check this using the echo command, which prints text to our terminal (formally known as standard output, but we’ll get to that later.)
echo ~
Let’s stay in our home directory and make sure we know where it is.
Looking at the Contents of any Directory (ls)
We have already used the ls command a bit now to list the contents of a directory while we were navigating.
With ls, we can specify which directory we wish to view the contents of, without having to change into that directory.
We simply type the ls command, followed by a space, then the directory we wish to view the contents of.
To look at the contents of the root directory of the file system (i.e. /), we simply add that directory after the command ls.
ls /
Here you can see a whole raft of directories which contain the vital information for the computer’s operating system. Among them should be the /home directory which is one level above your own home directory, and where the home directories for all users are located, as mentioned earlier. Try looking in that directory:
ls /home
Relative vs Absolute Paths
This is an important concept required for finding your way around any computer (or file system). To aid you in your understanding of this concept lets do a simple mind experiment. Can anyone explain to me how to get to the ground floor bathroom in this building?
There really is only 2 ways to do so:
- give step by step directions from the main entrance (or another landmark)
- give step by step directions from where we are right now
The same concept applies to the terminal except that there is only one “main entrance” which is root /.
All paths starting with / are said to be absolute paths, and detail the path from the “main entrance”.
These paths, if correct, will work no matter where you are in the file system.
On the other hand a relative path makes use of the fact that the terminal knows exactly where you are now, so you can tell it where you want to go relative to that position.
In summary:
- Absolute paths specify a location (file or directory) in the system all the way from the top most directory (root directory) and thus always start with
/ - Relative paths specify a location in the system relative the the current working directory and will never start with the slash. This is an important point which will hopefully become more clear throughout the session.
Note: The terminal also knows of one more landmark which we hinted at before and that is the users home directory.
As mentioned before, the special charater to denote this location is the tilde ~.
It can be used from anywhere as a landmark just like the slash. Try it!
Questions
Look through the following paths and say which are absolute and which are relative.
- /var/www/log/dmesg
- ../Desktop/temp/log.txt
- /home/greg/Documents/thesis.docx
- ./var/www/
- home/jack/music/live.mp3
Starting from /home/amanda/data/, which of the following commands could Amanda use to navigate to her home directory, which is /home/amanda?
- cd .
- cd /
- cd /home/amanda
- cd ../..
- cd ~
- cd home/amanda
- cd /data/..
- cd
- cd ..
Tab Completion
Typing in long paths and/or filenames can be tedious. Fortunately the terminal has a special feature which aids in completing this task called tab completion. This is the ability to automatically complete a command, file or directory name using the Tab key. Try typing
ls ~/R_<tab>
where <tab> represents the Tab key.
Notice how R_training is completed automatically!
This functionality will automatically fill as far as it can until conflicting options are reached.
In this case, there was only one option so it was able to complete all the way to the end of the file path.
This enables us to quickly enter long file paths without the risk of typos.
Using this trick will save you an enormous amount of time trying to find why something doesn’t work.
The most common error we’ll see today will be mistakes in file paths caused by people not taking advantage of this trick.
Now enter
ls ~/R<tab>
and for most of you, it will look like the auto-complete is not working. This is because there are two possibilities and it doesn’t know which you want. Hit the tab twice and both will appear in the terminal, then choose one. As well as directory paths, you can use this to auto-complete filenames.
Handy tip: This technique can be used to also find command names.
Type in he followed by two strikes of the Tab key and it will show you all of the commands that begin with the string he, such as head, help or any others that may be installed on your computer.
If we’d hit the Tab key after typing hea, then the command head would have auto-completed, although clearly this wouldn’t have saved you any typing.
Handy tip: And just to reiterate, you can scroll through your previous commands by using the up arrow to go backward, and the down arrow to move forward. This can be a big time saver if you’ve typed a long command with a simple typo, or if you have to do a series of similar commands.
Wildcards
Alternatively referred to as a wild character or wildcard character, a wildcard is a symbol used to replace or represent one or more characters.
Wildcards are typically either an asterisk (*), which represents one or more characters or question mark (?), which represents a single character.
This is like in some card games the joker is used as a wildcard meaning that the owner of that joker can choose to view it as any one of the 52 playing cards in the deck.
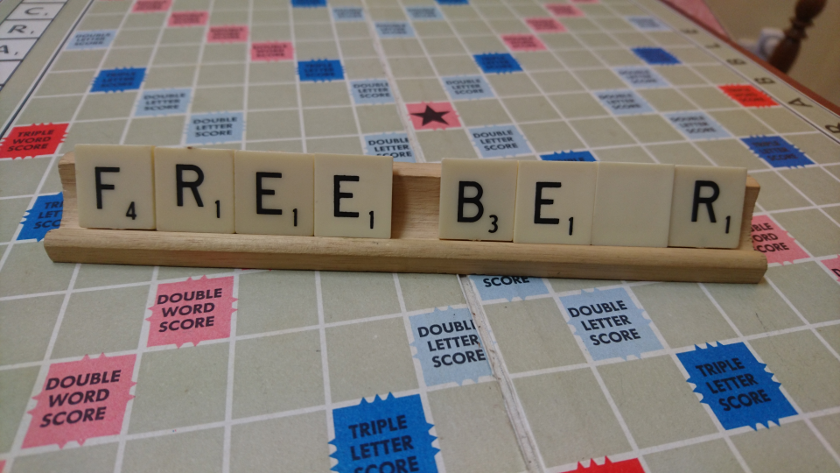
A similar concept is the blank tile in Scrabble which can be used as any one of the letters in the alphabet in order to complete words (like Free and ”Bear”!)
Wildcards in the terminal are somewhat like this. Here is the basic set of wildcards;
?Question mark - represents exactly one character and can be used side by side to represent more characters (ie. ??? for exactly 3).*Asterisk - represents zero or more characters[ ]Closed square brackets - user defined range of characters{ , }Closed curly braces around list of strings - alternations of whole strings, e.g.{this,that,other}-filematchesthis-file,that-fileandother-file.
We have set up some exercises for you to try out your skills using wildcards and below are some examples of how wildcards are used. Please just copy and paste the following four lines of code into your terminal to create some files for this section.
cd
mkdir temp
cd temp
touch cubane.pdb ethane.pdb methane.pdb octane.pdb propane.pdb elephant.txt i_dont_belong.txt neither_do_i.txt pentane.pdb this_is_boring_as_hell.txt
Let’s have look at the files we just created
ls
What files will be returned by?
ls p*
ls *pdb
What will the different results be for the following two commands?
ls ?thane.pdb
ls *thane.pdb
We can also use the square brackets to specify one or more characters
ls *.[p]*
ls *.[t]*
ls *.[pt]*
Creating and Deleting Files
Commands and Arguments
In most of the above, we typed the name of a command like cd, ls or echo then followed it with the name of a directory, e.g. ls /.
This follows the important syntax of command argument where a space separates these two.
Later on we’ll see commands where we supply multiple arguments, and the space is playing a key role here.
In bash the first space separates the command from the argument and every subsequent space separates the arguments.
This is the main reason we don’t like to use directory names which contain spaces.
There is a way of using spaces (by “escaping” the space with a \), but spaces in paths can cause difficulties during numerous process and should be avoided at all costs.
Making and Removing Directories
So we now know how to move around and explore the file system from within the terminal but how do we create new ones or modify what already exists. Let move to our home directory if we are not already there
cd ~
Now, check the contents of this directory (you should be aware of the contents before you run the command)
ls
Lets create a directory. In the terminal we create directories using the command mkdir which
is short for make directory.
Make Directory just like Change Directory takes one argument.
In this case it will be the name of the directory to create. Lets call it “practice_directory”.
mkdir practice_directory
Questions
- Can you think of an alternative argument that would result in the same outcome? Hint: was that a relative or absolute path?
- Note that we used the underscore symbol to conect the two words in the directory name. What do you think would happen if we replaced it with a space?
That was simple. Lets get rid of it now. The command we use to remove a directory is rmdir which is short for remove directory.
Note: rmdir only works on empty directories. Soon we’ll learn how to delete directories even if they contain files.
Make/Remove Files (touch rm)
Interestingly, unlike mkdir there is no dedicated command to make a file.
Fortunately, any one of about a dozen commands that manipulate files will, create a file if that file does not already exist.
The most commonly used command to achieve this is with the touch command.
touch creates a file if it does not exist, but leaves its contents unaltered if it does.
Create a new file called “practice_file”.
touch practice_file
Easy! It’s empty but we created it.
Check that it’s there before removing it using rm which is short for remove.
rm practice_file
Let’s create a directory for the rest of the session, and perform all the remaining commands in this directory
mkdir ~/Bash_Workshop
cd ~/Bash_Workshop
Copy/Move/Rename (cp mv)
When calling the commands to make or remove files/directories we provide one piece of information (argument) to the command which is the name of the object to create/remove.
With the cp and mv (stands for copy and move repectively) commands, we now need to provide an additional peice of information (2 arguments).
- the name of the object we want to copy/move
- the place in the file system to move the object to
The order is important so the command must look like this,
cp <name_of_object_to_copy> <location_to_copy_object_to>
or
mv <name_of_object_to_move> <location_to_move_object_to>
Note: renaming a file OR directory is just a special case of the mv command.
For example, given the file “file one.txt”, we would use the mv command like this to rename it.
Let’s create the file and check that it’s there first.
Then we’ll rename it (using mv) and delete it.
touch file_one.txt
ls
OK. If you see it there you’ll know it exists.
mv file_one.txt renamed_file.txt
ls
You should now see the file with it’s new name in that list, so let’s delete it.
rm renamed_file.txt
Task
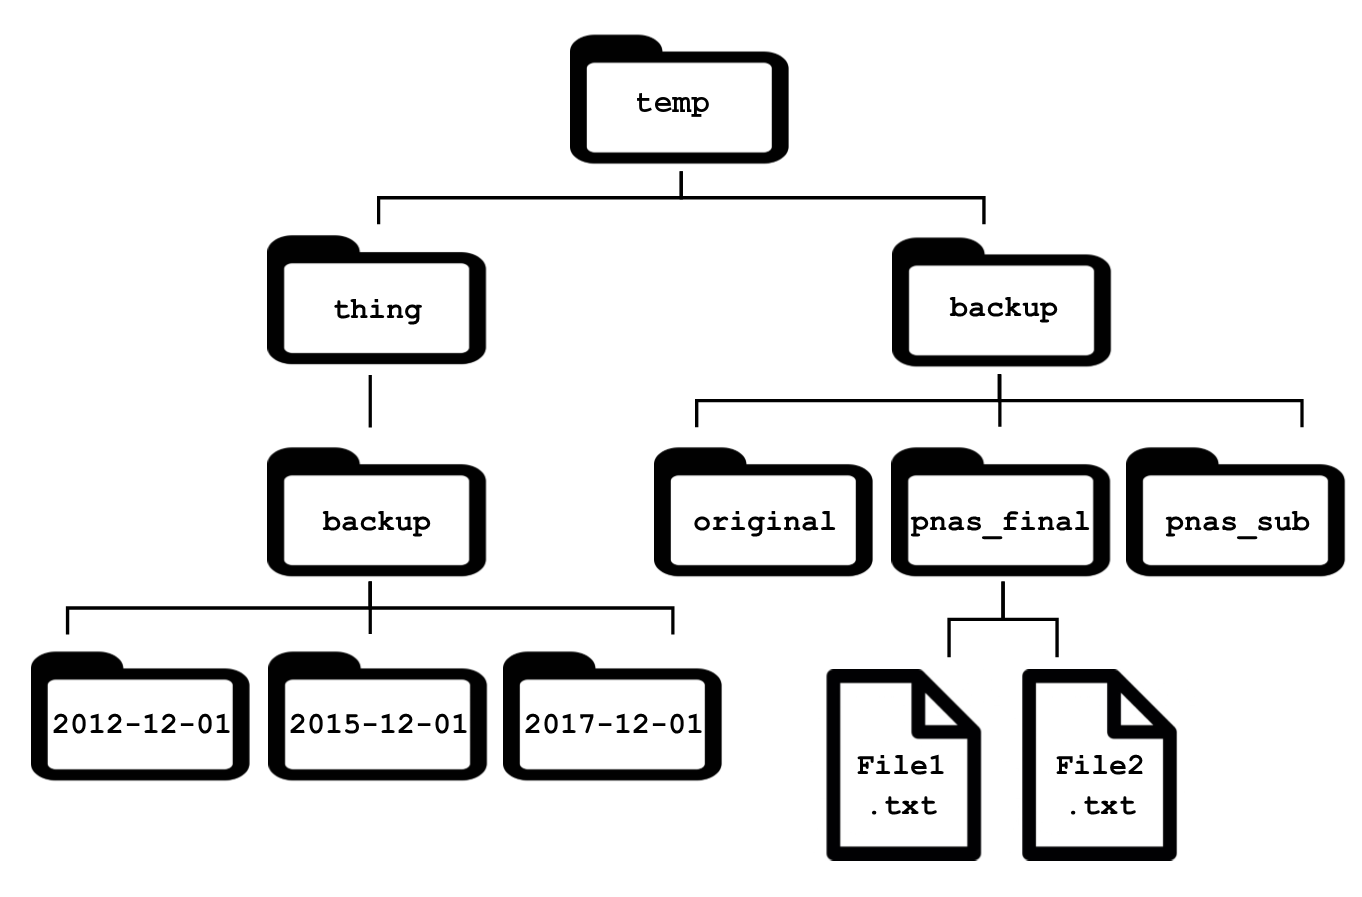
1 - See if you can recreate these directories in your home directory (~).
Create some in order, but for some of the others try creating directories/files in your home directory, then moving them to their correct location.
After you have finished, try deleting the “temp” directory.
Removing non-empty directories
As is, neither rmdir or rm will delete a directory that contains an object.
To do so we must recursively delete the contents one at a time or by using a wild card (more on this to come). However, there is a flag in the “rm” command that does this automatically. Try this on your newly created directories,
rm temp
(This wont actually work)
rm -r temp
Done!
Adding Arguments (or flags) to Commands
In the previous command we added the flag -r to the command rm.
This took the place of the first argument placing the directory name as the second argument, and told rm how to operate on the directory.
Here, we set the command rm to act recursively.
Accessing Help Pages
How do we know what additional flags can be set as an argument?
Most commands come with an inbuilt help page, that we can access a few ways.
The most common method is to add the flag --help after a command.
rm --help

Note the common convention that single letters follow a single dash (-) whilst complete words follow a double dash (--).
What would happen if we tried to type two words after the -- with a space between them?
This method of checking the help page printed the entire contents of the help file into the terminal window.
This can be great for short help pages like this, but can sometimes be so long that we can’t read everything.
Most of the builtin commands like rm also come with a full manual which is much longer and more detailed.
We can access this using a command man which is actually a bit tricky.
Instead of dumping all the information, this will open an interactive viewer within the terminal itself called less, which is like a primitive Adobe Acrobat Reader, where we can only view text information.
Once we enter this viewer and have finished looking through the manual, we have to exit using the q key (for quit).
This will return us to bash.
Let’s call the command man (for manual) and give it the argument rm.
This tells man which manual to open.
man rm
To scroll through this manual, we can use our cursor arrows to move line by line, or you can use the space bar to jump down a page (i.e. a screenful).
The b key goes back a page.
As well as viewing help pages, the viewer (or pager) less can be used for browsing text-based files in the terminal itself.
We’ll come back to this later.
WARNING
The above command rm -r is potentially VERY dangerous.
DO NOT enter this, but if we executed rm -r from the root of our file system (/), can you imagine what would happen?
If you just broke out into a cold sweat, that’s normal and completely justified!
If you did not, please try out this linux distribution.
It is also important to note that there is no undo option in bash.
What’s done is done, so do be careful.
Question
Use the man command to access the help page for ls.
- How would we sort files by size when using
ls? - How would we only display directories instead of all files?
- How would we sort files by the last time they were saved?
- Why can we not use the
-hmethod to access the help page forls?