Introduction to Bash
Course Homepage
April 2019
This project is maintained by UofABioinformaticsHub
- Introduction
- Looking Through Large Files
- Standard Output
- Manipulating Data From Files
- File Management
More commands and tools
Introduction
Recap
Last time we discovered some key bash commands:
- Navigating directories using
cd,pwdandls - Creating and deleting files or directories using
touch,mkdir,rmdirandrm - Copying, moving and renaming files or directories using
cpandmv - Finding help pages using
manor the arguments-hand--help
We also learned some important concepts
- Tab auto-completion and using the [Up]/[Down] arrows
- Relative vs Absolute paths
- The
<command> <argument>structure of bash commands - Using wild cards
?,*,[]and{}to select subsets of files or directories
This Session
We will introduce a set of highly useful additional commands, often known as filters. Whilst the first session was mainly focussed on navigation around the file system, this session will be focussed on working with the contents of files.
Commands for today:
head,tail,cat,less,wcfilecut,sort,uniq|,>,>>,echowget,curlzip,unzip,gzip,gunzip,zcat,tar
Key concepts for today:
- Understanding text vs binary data
- Understanding
stdin,stdoutandstderr - Downloading data
- Compressed data
Before we start
Login to your VM if you haven’t already and navigate to your home folder.
cd ~
You should see a file in the ~/data folder called BDGP6_genes.gtf, so let’s move this into the Bash_Workshop folder we created in the last session.
After that we’ll move into this folder.
mv ~/data/BDGP6_genes.gtf ~/Bash_Workshop
Question
Can you think of any other way we could have done this? Could we have entered the Bash_Workshop folder first? If so, what commands would we use?
File Suffixes and Plain Text Files
This file we’ve moved has the suffix .gtf.
What program do you think you should open this with?
(If you answered ‘none’, well done)
We’re very used to files with a given suffix being associated with a specific program, such as .xlsx with Excel, and .docx with MS Word.
These file types are binary files, which means they are not in plain text format, but have been (at least partially) encoded into 0/1 binary numbers that computers see everything as.
We generally can’t read files like this with anything but specific software which knows how to decode these patterns of 0 and 1.
You can use the file command to have the computer guess the file type from its contents.
Try this on a few files.
file /usr/bin/man
file Bash_Workshop
file .
Many other file types are actually just saved as plain text, with the most common of these being a .csv file.
We could actually open a .csv (comma separated values) file with any plain text editor/viewer, even though we’re used to opening them with Excel.
Another common file type is a .tsv file, which represents tab-separated values as opposed to comma-separated values.
If we changed the suffix of a .csv file to .tsv, would we have changed the commas within the file to tabs?
Clearly, the answer is no.
File suffixes for plain text files like this are really just communicating to other users what the layout of the file is.
In the case of a .gtf file there is a set layout, which includes some “header” lines followed by a series of tab-separated columns.
It’s really just a plain text file though and we could change the suffix at will, like we imagined for our imaginary csv/tsv file.
If we do that though, nobody else will know what the internal structure of the file will be and we’ll either be a difficult co-worker or a terrible practical joker.
The important thing to realise is that the suffix of files doesn’t affect their internal structure.
They are simply used to communicate clearly what the structure of the file is.
Unfortunately, it’s not uncommon to come across files with a .csv suffix that are actually tab-delimited.
Anyone who does this should be sent to the naughty corner and forced to use nothing but MS Office products for the remainder of their life.
Looking Through Large Files
Printing File Contents to stdout
Now we have a file to look through let’s try to look at it to see what we mean by a ‘plain-text’ file and ‘header lines’.
The way to dump the entire contents of a file to the terminal (or stdout) is to use the command cat.
Try this and all the information in the file will whiz past you in the terminal.
If you get sick of watching it, just hit Ctrl+C to stop the stream of text.
cat BDGP6_genes.gtf
This is clearly not a helpful way to look at a large file like this, so an alternate method is just to print the first few lines using the command head.
Note the lines at the start which begin with a # (hash) symbol.
These are the ‘header’ lines which are not in the tab-separated format that the rest of the file is, but contain important information about the contents of the file.
Here is the genome build, genome build date etc., which is pretty darn useful information for a bioinformatician.
head BDGP6_genes.gtf
head shows us the first 10 lines by default, and we can change this to the first 20 by setting the additional argument (or flag) -n to the value 20.
We can choose any value we like here, as long as it’s a whole number (or integer).
head -n 20 BDGP6_genes.gtf
In the typical way that programmers like dumb jokes and obvious commands, to look at the end of the file we can use tail.
The flag -n can be set in the same way for this.
tail BDGP6_genes.gtf
These are 3 ways to look through any plain text file in bash by printing a stream of output to stdout.
Using the Pager less
If we want to browse through the file in a more interactive way, we can use the pager less which many of us saw last session when we discovered man pages.
In actual fact, using the -h or --help flags effectively dumped the whole help page to stdout, whilst using the man command instead sends the stream of information to less.
Let’s try this with our .gtf file.
less BDGP6_genes.gtf
Now we can browse the file using the space bar to move down a page, the b key to move back a page and the arrows to move up or down a line.
Although we can navigate through the less pager using up and down arrows on our keyboards, some helpful shortcuts are:
| Command | Action |
|---|---|
| Enter | go down one line |
| Spacebar | go down one page (i.e. a screenful) |
| B | go backwards one page |
| < | go to the beginning of the document |
| > | go to the end of the document |
<number> Enter |
go to the line at <number> |
| Q | quit |
You won’t be able to type anything into the file, or into bash here so after you’ve tried navigating around, return to bash using the q key for quit.
less is actually quite powerful and has functions for searching for key pieces of text.
Open the gtf file in less again and try entering /ncRNA once the file has opened.
By typing the / we are telling less that a search pattern follows, and once we hit the Enter key, less searches for the pattern and highlights any occurrences.
We can search for the same pattern again simply by hitting the / key and hitting Enter again, or simply by pressing N for “next”.
We only need to re-enter a pattern if we’re searching for something new.
This way we can quickly step through large files and look for any text that we’re trying to find.
Try entering a few other patterns and see if you can find anything you’re interested in.
Once you’ve finished exploring, hit Q to quit less.
To fully explore less you can check out the man page for less, which will ironically be shown to you in less.
(Programmers are hilarious).
If you’re on git bash you’ll have to be content with the less hysterical less --help.
(Get it: “less hysterical”. I told you we’re hilarious.)
Word and line counts
We can quickly check for the number of entries in a file by using the command wc.
This gives three values by default.
wc BDGP6_genes.gtf
To find out what they mean, check the help page.
A common usage is to quickly perform a line count, using wc -l.
Try it out and see how many lines our gtf file has.
Standard Output
Text In the Terminal
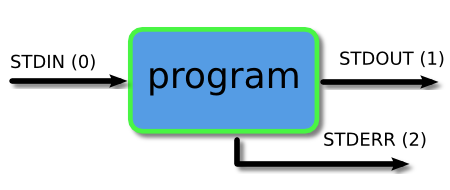
All the information we’ve seen in the terminal so far has been from a data stream known as standard output, or stdout for short.
There are two primary data output streams in play when we use commands in bash.
The first as we’ve seen is stdout, with the alternative stream being standard error, or stderr for short.
This is where commands and tools send their error messages, and some NGS tools output important information to this stream.
Both data streams appear in the terminal, which can also be a little confusing, however when we redirect the output in the sections below, only stdout will be redirected.
Redirection of stderr will not be covered, but is also a common task.
We’ll introduce stdin in a few minutes too, but this is an alternative input which tools are able to operate on, besides directly working on files.
Figure 1: Data Streams
When a command sends information to us via stdout, we refer to this as printing to stdout.
This dates back to the days before everyone had printers, when printing to the screen was the main method of interacting with computers.
We can display a line of plain text in stdout by using the command echo, which we briefly saw last session.
The most simple program that people learn to write in most languages is called “Hello World” and we’ll do the same thing today.
For this line, the quotes can either be single or double.
echo 'Hello World'
That’s pretty amazing isn’t it and you can make the terminal window say anything you want without meaning it.
echo 'This computer will self destruct in 10 seconds!'
There are a few subtleties about text which are worth noting.
Inspect the man echo page and note the effects of the -e option.
(This option has not been included in the help page on macOS. The argument does work in the actual command though.)
This allows you to specify tabs, new lines and other special characters by using the backslash to signify these characters.
This is an important concept and the use of a backslash to escape the normal meaning of a character is very common.
Try the following three commands and see what effects these special characters have.
echo 'Hello\tWorld'
echo -e 'Hello\tWorld'
echo -e 'Hello\nWorld'
As we’ve seen above, the command echo just repeats any subsequent text. Now enter
echo ~
We’ve already tried this last time, so you should now understand why this has happened. If you don’t quite get it, call a helper over or ask someone next to you.
Although this may have seemed trivial, we often include lines like the above in scripts to provide messages about the progress of our tasks.
As we’ll see later, echo is actually a very heavily used command.
Redirecting stdout To a File
Instead of just sending the output of a command to stdout, we can redirect this output into a file using the > symbol.
If the file doesn’t exist, bash will simply create the specified file and write the output into it, like using touch and including some information all in one step.
If the file does exist, it will immediately be overwritten without any warnings.
Let’s see the > symbol in action.
First, make sure you’re still in the Bash_Workshop folder.
Now we’ll combine the echo command with the redirection:
echo 'Hello' > hello.txt
Notice that the word Hello was no longer printed to your screen.
Instead a file called hello.txt was created and we can simply view the entire contents of the file using the command cat
cat hello.txt
To add any additional information to the file, we can use the >> symbol which appends new information to the file without overwriting anything.
If the file doesn’t already exist it will be created, but this time if the file does exist, the file will not be overwritten, but rather the new information will be added to the end of the existing information.
Let’s see this in action.
(Pay attention to the correct quotation marks here. If you use single quotation marks, the apostrophe will be interpreted as the end of the quote marks.)
echo "It's me." >> hello.txt
cat hello.txt
(Did you remember to use tab auto-complete in the above commands?)
For those using phoenix as an HPC, the queuing system will usually generate a file from each job/script which ends in *out. This is all of the standard output from your job captured into a file for you to inspect later.
Redirecting stdout to Another Tool
The idea of sending text to a file, like we have just done makes intuitive sense for most of us.
There is another incredibly useful functionality in bash which is commonly referred to as the pipe.
The reasons for this are two-fold.
Firstly, we use the | symbol which looks like a drain-pipe, and conceptually this is exactly what we are doing and why we have tried to make you familiar with the term stdout.
Apart from less, all of the above tools have sent their output to stdout which has either appeared in the terminal window, or in the files we created.
Most commands are also able to accept input from stdout instead of referring to a file on the disk, and by using the | symbol it is literally like attaching a pipe to stdout from one command and redirecting the stream of data to the standard input (i.e. stdin) of another command.
Let’s try this with a couple of familiar processes first. How many lines do you see from this process we tried earlier?
echo -e "Hello\tWorld"
So if we take this output and pipe it into wc, we should know what to expect.
echo -e "Hello\tWorld" | wc -l
So here, we’ve taken the output from echo and piped it to the input of wc.
Let’s confirm what we’re seeing by changing that <tab> separator to a line break.
echo -e "Hello\nWorld" | wc -l
There is no realistic limit to how many commands we can chain together like this.
We can even do silly (but sometime useful) things like piping the output of a help page into less if we’re on git bash, and don’t have any man pages.
This won’t work on macOS since ls does not have a help page on macOS (this is a BSD vs GNU difference).
ls --help | less
Manipulating Data From Files
Selecting a column
Sometimes we want to dig a little deeper through a file, and we can extract one or more columns from any delimited file using the filter cut.
By default cut looks for <tab> separated columns, but this can be set to any delimiter.
Let’s try to grab just the first column, except this has thousands of lines, so let’s use our amazing skills to just look at the first few lines using the pipe in a very common way.
cut -f1 BDGP6_genes.gtf | head
This will have sent the first column to stdout, wherever a <tab>-separated line was found.
Where no <tab> symbol was found, this will have sent the whole line to stdout.
By default we’re using the <tab> symbol as the delimiter, so check the help or man page to see if you can find a way to stop cut printing any lines that don’t contain a delimiter.
Now we’ve found out how to extract the chromosome information from this file, which is what the first column holds, let’s try and do something useful.
Summarising data using uniq
Let’s see how many chromosomes we have gene information about, by taking this column and just restricting it to unique entries, using the command uniq.
Now we’re familiar with the pipe, we can send this column to uniq.
cut -f1 -s BDGP6_genes.gtf | uniq
This is a list of all the chromosomes with entries in that column.
We can add the additional flag -c to uniq to count these.
cut -f1 -s BDGP6_genes.gtf | uniq -c
So now we’ve just counted how many genes there are on each chromosome.
Pretty cool, huh!
If we needed that for another analysis we could even write this to a file using >.
Should we keep the header information if we did that?
We can also select multiple columns using the above strategies.
cut -f1,2 -s BDGP6_genes.gtf | uniq -c
Or even
cut -f1-3 -s BDGP6_genes.gtf | uniq -c
Let’s go completely nuts and use a different delimiter for the cut command.
You might have spotted that beyond the 8th column, the <tab> delimiters stop and we have a single column, with values separated by a semi-colon.
We can specify this as the delimiter using the argument -d\;.
Here we’ve had to escape the semi-colon as it is a special character as we want to use it as a true semi-colon.
If we wanted to get the gene_biotype column, what number would we need to put after the -f argument?
Try piping this into uniq -c and see what happens?
Was this as you expected?
cut -f4 -s -d\; BDGP6_genes.gtf | uniq -c
Summarising files using sort
The algorithm underlying uniq -c checks adjacent lines for equality, and if they’re not equal keeps them both.
If they’re equal it discards the second entry.
To really make this work, we’d need to sort the column in between the cut and uniq commands.
cut -f4 -s -d\; BDGP6_genes.gtf | sort | uniq -c
File Management
Downloading Files
most of us are familiar with downloading a file using our browser, but we can also download files using bash.
Two common tools for this are wget and curl.
They behave quite similarly, so let’s try them both.
First we’ll delete our gtf file, so we can download it again using bash.
This file is stored at https://uofabioinformaticshub.github.io/BASH-Intro/files/BDGP6_genes.gtf, so let’s try this using curl.
curl -O https://uofabioinformaticshub.github.io/BASH-Intro/files/BDGP6_genes.gtf
or equivalently with wget (you do not need to do this since it will just repeat the download to the same file name),
wget https://uofabioinformaticshub.github.io/BASH-Intro/files/BDGP6_genes.gtf
This will save the original file, and if you didn’t delete it, the new copy may have been renamed.
To avoid this type of problem , we can assign the name of the downloaded file using the -O flag.
wget https://uofabioinformaticshub.github.io/BASH-Intro/files/BDGP6_genes.gtf -O duplicate.gtf
An important difference between curl and wget is that curl streams the download to stdout unless a -O or -o (check the man page for this option) is set.
curl -o another_duplicate.gtf https://uofabioinformaticshub.github.io/BASH-Intro/files/BDGP6_genes.gtf
Checking Files
If you’ve just run all of the above lines, you’ll actually have three copies of the same file on your disk.
There is a convenient utility in bash called md5sum which we can use to check if two files are identical.
The process of calculating an md5Sum is well beyond the scope of today, but according to the algorithm gurus, every file in existence will have a reasonable chance of having a unique sum using this algorithm. NB: macOS users won’t have md5sum installed. Please use md5 -r instead for all subsequent commands.
md5sum BDGP6_genes.gtf
For small files like this, it’s very fast to calculate, but can be a fair bit slower for large files. We can also run this on an entire directory, or a subset of files, using the wild cards from last session.
md5sum *gtf
And we could sort these in order to more easily detect duplicated files
md5sum * | sort
These sums are sometimes given by data providers so we can check our files against the originals to ensure nothing has become corrupted during a file transfer. Although this is relatively rare, it does happen so is good to know about.
Compressed files
Sometimes the files we download are compressed with one of a number of algorithms. The file suffix is usually informative here, and helps us decide on the correct algorithm for extracting files. The most common formats are given below.
| File Suffix | Compression Command | Extraction Command | Useful Arguments |
|---|---|---|---|
.zip |
zip |
unzip |
-d, -c, -f |
.gz |
gzip |
gunzip zcat |
-d, -c, -f |
.tar.gz |
tar |
tar |
-x, -v, -f, -z |
.bz2 |
bzip2 |
bunzip2 |
Using zip
Let’s try compressing some of our additional .gtf files so we can see how this works.
The most common format (particularly for Windows users) is a zip file, and this is pretty easy to use.
To zip a file, we just enter the name of the intended archive as the first argument to zip (without the suffix), and the file we wish to compress as the final argument to zip.
zip duplicate duplicate.gtf
This will have created duplicate.zip and the original file will still be there.
Let’s check our directory using the long-listing version of ls, and telling ls to write file sizes in human-readable format.
As you’ll see, the compressed file is much smaller.
ls -lh dup*
AS we already have the original, we can delete this zip file without too many fears.
rm duplicate.zip
Using gzip
A very common compression type in bioinformatics is gzip, which usually exports files with a gz suffix.
Let’s create a gzip version of our duplicate.gtf file again.
gzip duplicate.gtf
ls -lh dup*
Notice, that this time the original was replaced with this compressed version. This can be very useful for quickly finding some disk space.
Let’s extract the file again.
gunzip duplicate.gtf.gz
If we’d wanted to keep the original, we could set the -k flag (for keep), although we don’t usually need to do this.
gzip -k duplicate.gtf
ls -lh dup*
A very handy feature of gzip compression is the -c flag, which instead of extracting the file, leaves the compressed file on disk, but streams the extracted contents to stdout.
gunzip -c duplicate.gtf.gz
This way we can pipe the output to any bash tools we need without extracting the file and bloating our disk usage.
There’s a shortcut to this in common use called zcat, which is an alias for gunzip -c and can be thought of as a zipped version of cat.
The only difference is we can type fewer letters and get away with it.
Using tar
The final of the most common compression formats is the tape archive format, which has a very long history.
These files usually end with the tar.gz or tgz suffix, but we don’t need to use gunzip first.
Usually these files contain complex directory structures and the common way to extract these is using tar -xzvf.
Many software tools actually come using this format and require you to run a Makefile in a specific directory, but this is starting to get into the serious part of town if you’re having to do this and you may want to ask for help.
Homework Questions
Using your Bash_Workshop folder
- Count how many genes are on each strand of each chromosome for the gtf
BDGP6_genes.gtf. - Using
wgetorcurl, download the file ftp://ftp.ensembl.org/pub/release-92/gtf/drosophila_melanogaster/Drosophila_melanogaster.BDGP6.92.gtf.gz - Without extracting the file, count how many different types of features there are in the third column.
- Write this summary to the file
featureTypes.txt - Repeat this process counting how many of each of these features there are on each chromosome and write the output to the file
featuresByChromosome.txt.