genomics_applications
Week 1 Practical Part 1
- Introduction to Bash
- Virtual Machines
- RStudio
- Running
bashon your VM - Setup the directory for today
- Initial Goals
- Finding your way around
- Manuals and Help Pages
- Some More Useful Tricks and Commands
- Putting It All Together
- Output from Command Line Commands
- Text In the Terminal
- Sending Output To A File
- Redirection Using The Pipe Symbol
- Inspecting genomic files using bash
- Writing Scripts
Introduction to Bash
Virtual Machines
The practicals that you will be participating in will make use of a computer that is provided by The University as a virtual machine (VM). The VM is essentially a program that is running on a server but which behaves as though it is an individual separate computer. You will be able to log in to the VM and interact with the programs that it has installed. The VMs provided each have 2 CPU cores, 8GB of system memory and 80GB of hard disk space. They are yours to use for the semester, but they are also yours to look after.
Please go here for instructions on connecting to your VM.
RStudio
You will be using a program called RStudio to interact with your VM. Each VM has RStudio Server running on it and serving a web page that you can interact with via a web browser.
When you have connected to the VM, you should see something that looks like this.
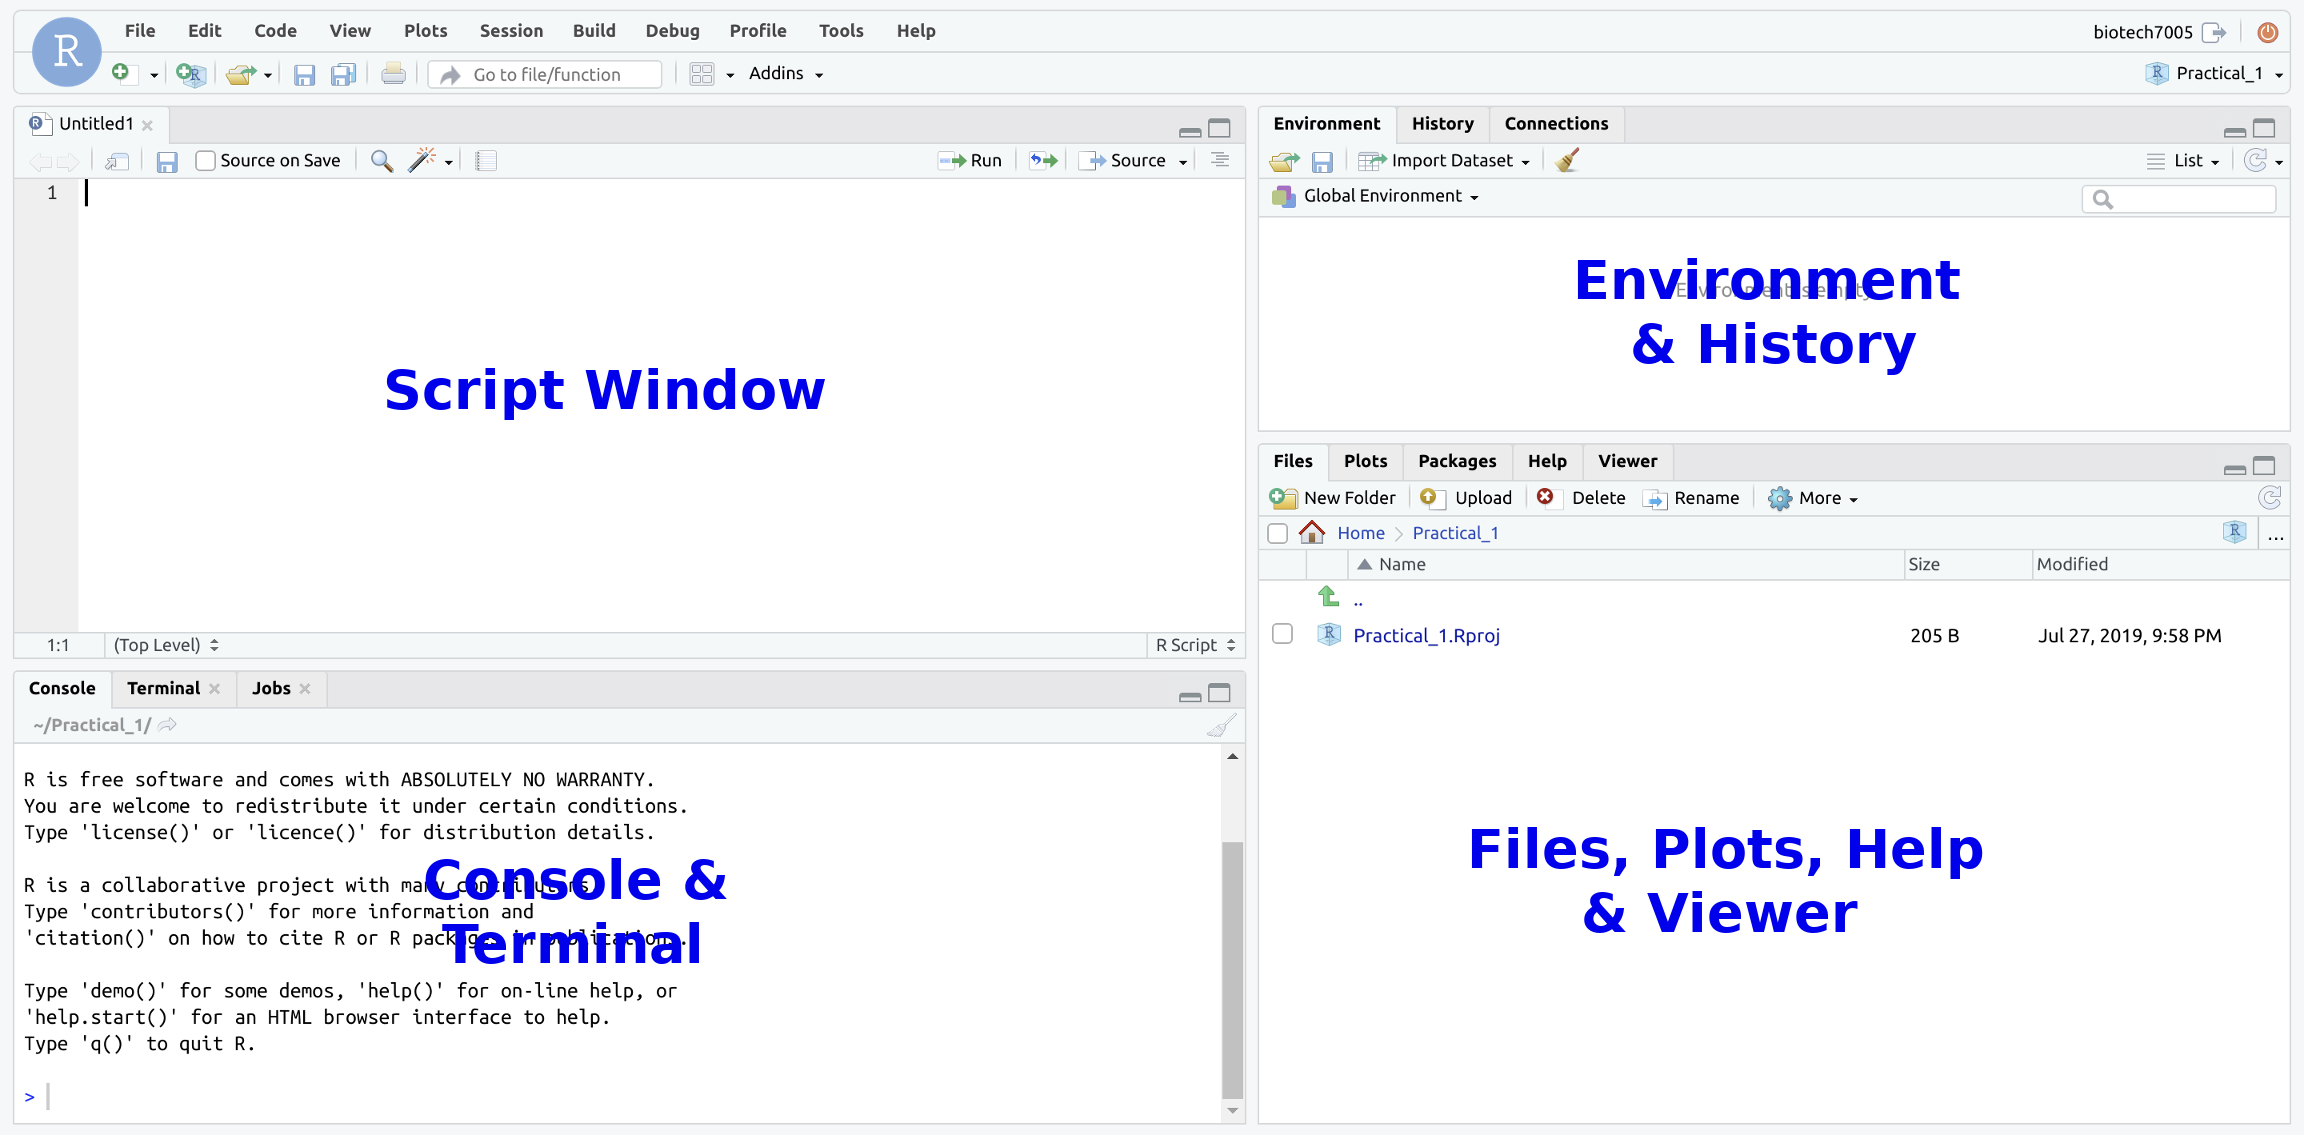
You will only be using the Terminal part (pane) of the RStudio window; this is the part that you used to reset your password. You can maximise the Terminal pane with the icon on the top right of that section of the window.
An important step in many analyses is moving data around on a high-performance computer (HPC), and setting jobs running that can take hours, days or even weeks to perform.
For this, we need to learn how to write scripts which perform these actions, and the primary environment for this is bash.
We can utilise bash in two primary ways:
- Interactively through the terminal
- Through a script which manages various stages of an analysis
For most of today we will work interactively, however a complete analysis should be scripted so we have a record of everything we do. This is often referred to as Reproducible Research, and in reality, our scripts are like an electronic lab book and will help you remember exactly what analyses you have performed. When you’re writing your thesis, referring back to your scripts will be very useful for writing your methods section.
Running bash on your VM
All computers running MacOS and Linux have a terminal built-in as part of the standard setup, whilst for Windows there are several options, including git bash which also enables use of version control for your scripts.
To keep everything consistent for this practical, we’ll use the terminal which is available inside RStudio.
Note that even though we’re using RStudio, we won’t be interacting with R today as R runs interactively in the Console.
Instead we’ll be using one of the other features provided by RStudio to access bash
To access this, open RStudio as you have for the previous practicals and make sure the Console window is visible.
Inside this pane, you will see a Terminal Tab so click on this and you will be at an interactive terminal running bash.
We’ll explore a few important commands below, and the words shell and bash will often be used interchangeably with the terminal window.
If you’ve ever heard of the phrase shell scripts, this refers to a series of commands like we will learn in these sessions, strung together into a plain text file, and which is then able to be run as a single process.
Although we haven’t specifically mentioned this up until now, your virtual machines are running a distribution of Linux, and we can access these machines by logging in remotely, as well as through the RStudio interface.
We’ll cover this later in the practical course.
Most High-Performance Computing (HPC) systems you use will require a knowledge of Linux so these practicals will give you the basics skills for working in this environment.
Most of the data analysis performed by the Bioinformatics Hub relies on the University of Adelaide HPC for data storage and data processing.
Setup the directory for today
First we will set up a directory for today’s practical. In general it is very worthwhile to keep all your project-specific code and data organised into a consistent location and structure. This are not essential, but is very useful and is in general good practice. If you don’t follow this step, you will be making your life immeasurably harder and will not be following ‘best practice’ data analysis. For practicals in Transcriptomics Applications where R will be used, everything will be harder if you do not follow the equivalent strategy there.
To make and enter the directory that you will be working in, run the following commands in the terminal pane (try to figure out what they mean — we will be going over them more later in the prac).
mkdir ~/Project_0
cd ~/Project_0
You will now find yourself in this directory you have created.
If you look at the bottom right pane of your RStudio session you will see Project_0 appeared when you executed mkdir ~/Project_0.
If you need to, you can navigate through the directories and select files with the file navigation pane just as you would with a normal file browser.
Making this directory to work in will help you keep everything organised so you can find your work later. Managing your data and code intelligently is a considerable challenge in bioinformatics.
Initial Goals
Now we have setup our VM, the basic aims of the following sessions are:
- Gain familiarity and confidence within the Linux command-line environment
- Learn how to navigate directories, as well as to copy, move and delete the files within them
- Look up the name of a command needed to perform a specified task
- Get a basic understanding of shell scripting
Finding your way around
Once you’re in the Terminal section of RStudio, you will notice some text describing your computer of the form
student@bioinf-xx:~/Project_0$
The first section of this describes your username (student) and the machine @bioinf-xx.
The end of the machine identifier is marked with a colon (:).
After the colon, the string (~/Project_0) represents your current directory, whilst the dollar sign ($) indicates the end of this path and the beginning of where you will type commands.
This is the standard interface for the Bourne-again Shell, or bash.
Where are we?
pwd
Type the command pwd in the terminal then press the Enter key and you will see the output which describes the current directory you are in.
pwd
The command pwd is what we use to print the current (i.e. working) directory.
Even though we are not using R, if you have setup the R project like we instructed above this command will probably return the directory.
/home/student/Project_0
Check with your neighbour to see if you get the same thing. If not, see if you can figure out why.
At the beginning of this section we mentioned that ~/Project_0 represented your current directory, but now our machine is telling us that our directory is /home/student/Project_0.
This raises an important and very useful point.
In bash the ~ symbol is a shortcut for the home directory of the current user.
If Dan was logged in, this would be /home/Dan whilst if Steve was logged in this would be /home/Steve.
As we are all logged on as student, this now stands for /home/student.
Importantly every user with an account on a machine will have their own home directory of the format /home/username1, /home/username2 etc..
Notice that they will all live in the directory /home which is actually the parent directory that all users will have a home directory in, as we’ve just tried to explain.
This can be confusing for many people, so hopefully we’ll clear this up in the next section or two.
In the above, the /home directory itself began with a slash, i.e. /.
On a unix-based system (i.e. MacOS and Linux), the / directory is defined to be the root directory of the file system.
Windows users would be more familiar with seeing something similar, the C:\ directory as the root of the main hard drive, although there are fundamental but largely uninteresting differences between these systems.
Note also that whilst Windows uses the backslash (\) to separate parts of a directory path, a Linux-based system uses the forward slash (/), or more commonly just referred to simply as “slash”, marking another but very important difference between the two.
cd
Now we know all about where we are, the next thing we need to do is go somewhere else.
The bash command for this is cd which we use to change directory.
No matter (almost) where we are in a file system, we can move up a directory in the hierarchy by using the command
cd ..
The string .. means one directory above (the parent directory), whilst a single dot represents the current directory.
Question
From which directory will cd .. not move to the parent directory?
Enter the above command and notice that the location immediately to the left of the $ has now changed.
Enter pwd again to check this makes sense to you.
If we now enter
cd ..
a couple more times we should be in the root directory of the file system and we will see / $ at the end of our prompt.
Try this and print the working directory again (pwd).
The output should be the root directory given as /.
We can change back to our home folder by entering one of either:
cd ~
or
cd
The initial approach taken above to move through the directories used what we refer to as a relative path, where each move was made relative to the current directory. Going up one directory will clearly depend on where we are when we execute the command.
An alternative is to use an absolute path.
An absolute path on Linux/Mac will always begin with the root directory symbol /.
For example, /foo would refer to a directory called foo in the root directory of the file system (NB: This directory doesn’t really exist, it’s an example).
In contrast, a relative path can begin with either the current directory (indicated by ./) or a higher-level directory (indicated by ../ as mentioned above).
A subdirectory foo of the current directory could thus be specified as ./foo, whilst a subdirectory of the next higher directory would be specified by ../foo.
If the path does not have a ./ or ../ prefix, the current directory is used, so foo is the same as ./foo.
Another common absolute path is the one mentioned right at the start of the session, specified with ~, which stands for your home directory /home/student, which also starts with a /.
We can also move through multiple directories in one command by separating them with the slash /.
For example, we could also get to the root directory from our home directory by typing
cd ../../
Return to your home directory using cd.
In the above steps, this has been exactly the same as clicking through directories in our graphical folder interface that we’re all familiar with.
Now we know how to navigate folders using bash instead of the GUI.
This is an essential skill when logged into a High Performance Computer (HPC) or a Virtual Machine (VM) as the vast majority of these run using Linux without a graphical user interface.
Important
Although we haven’t directly discovered it yet, most file systems used on Unix-based systems such as Ubuntu are case-sensitive, whilst Windows file systems are usually not.
For example, the command PWD is completely different to pwd and doesn’t actually exist on your (or any) default installation of bash.
Note that while MacOS is a unix behind the scenes, it has a semi case-insensitive file system by default.
This will cause you pain if you are not aware of it.
If PWD happened to be the name of a command which has been defined in your shell, you would get completely different results than from the intended pwd command.
Most bash tools are named using all lower-case, but there are a handful of exceptions.
We can also change into a specific directory by giving the path to the cd command using text instead of dots and symbols.
Making sure you’re in your home directory we can change back into the Project_0 directory
cd
cd Project_0
pwd
This is where we started the session.
Tab auto-completion
Bash has the capacity to provide typing suggestions for command names, file paths and other parts of commands via a feature called auto-completion. This will help you avoid a ridiculous number of typos.
If you start typing something bash will complete as far as it can, then will wait for you to complete the path, command or file name. If it can complete all the way, it will.
Let’s see this in action; change into your home folder and make two new directories. These directories are just to demonstrate some aspects of tab auto-completion.
cd
mkdir Practical_1
mkdir Practical_2
Now to change back into your Project_0 folder, type cd Pr without hitting enter.
Instead hit your Tab key and bash will complete as far as it can.
If you have setup your directories correctly, you should see this complete to cd Practical_ which is unfinished.
You also have Practical_1 and Practical_2 in your home folder, so bash has gone as far as it can.
Now it’s up to us to enter the final 0 before hitting Enter.
When faced with multiple choices, we can also hit the Tab key twice and bash will give us all available alternatives.
Let’s see this in action by changing back to our home folder.
cd
Now type cd Pr and hit the Tab key twice and you will be shown all of the alternatives.
You’ll still have to type the 0 though.
Another example which will complete all the way for you might be to go up one from your home folder.
cd
cd ..
Now to get back to your home directory (/home/student) start typing cd s followed by the Tab key.
This should auto-complete for you and will save you making any errors.
This also makes navigating your computer system very fast once you get the hang of it.
Importantly, if tab auto-completion doesn’t appear to be working, you’ve probably made a typo somewhere, or are not where you think you are. It’s a good check for mistakes.
You can now delete empty Practical_1 and Practical_2 directories.
rmdir ~/Practical_1
rmdir ~/Practical_2
Question
Are the paths ~/Practical_1 and ~/Practical_2 relative or absolute paths?
Looking at the Contents of a Directory
There is another built-in command (ls) that we can use to list the contents of a directory.
This is a way to get our familiar folder view in the terminal.
Making sure you are in your home directory (cd ~), enter the ls command as it is and it will print the contents of the current directory.
ls
This is the list of files that we normally see in our graphical folder view that Windows and MacOS show us by default.
We can actually check this output using RStudio too, so head to the Files tab in the Files window.
Click on the Home icon ( ) and look at the folders and files you can see there.
Do they match the output from
) and look at the folders and files you can see there.
Do they match the output from ls?
Ask for help if not.
Alternatively, we can specify which directory we wish to view the contents of, without having to change into that directory.
Notice you can’t do actually this using your classic GUI folder view.
We simply type the ls command, followed by a space, then the directory we wish to view the contents of.
To look at the contents of the root directory of the file system, we simply add that directory after the command ls.
ls /
Here you can see a whole raft of directories which contain the vital information for the computer’s operating system.
Among them should be the /home directory which is one level above your own home directory, and where the home directories for all users are located on a Linux system.
Have a look inside your Project_0 directory from somewhere else. Tab auto-completion may help you a little.
cd
ls Project_0
Navigate into this folder using you GUI view in RStudio and check that everything matches.
Question
Give two ways we could inspect the contents of the / directory from your own home directory.
Creating a New Directory
Now we know how to move around and view the contents of a directory, we should learn how to create a new directory using bash instead of the GUI folder view you are used to.
Navigate to your Project_0 folder using bash.
cd ~/Project_0
Now we are in a suitable location, let’s create a directory called test.
To do this we use the mkdir command as follows (you saw this above in tab auto-completion):
mkdir test
You should see this appear in the GUI view, and if you now enter ls, you should also see this directory in your output.
Importantly, the mkdir command above will only make a directory directly below the one we are currently in as we have used a relative path.
If automating this process via a script it is very important to understand the difference between absolute and relative paths, as discussed above.
Adding Options To Commands
So far, the commands we have used were given either without the use of any subsequent arguments, e.g. pwd and ls, or with a specific directory as the second argument, e.g. cd ../ and ls /.
Many commands have the additional capacity to specify different options as to how they perform, and these options are often specified between the command name, and the file (or path) being operated on.
Options are commonly a single letter prefaced with a single dash (-), or a word prefaced with two dashes (--).
The ls command can be given with the option -l specified between the command and the directory and gives the output in what is known as long listing format.
Inspect the contents of your current directory using the long listing format.
Please make sure you can tell the difference between the characters l (lower-case letter ‘l’) and 1 (number one).
ls -l
The above will give one or more lines of output, and one of the first lines should be something similar to:
drwxrwxr-x 2 student student 4096 Aug 12 hh:mm test
where hh:mm is the time of file/directory creation.
The letter d at the beginning of the initial string of codes drwxr-xr-x indicates that this is a directory.
These letters are known as flags which identify key attributes about each file or directory, and beyond the first flag (d) they appear in strict triplets.
The first entry shows the file type and for most common files this entry will be -, whereas for a directory we will commonly see d.
Beyond this first position, the triplet of values rwx simply refer to who is able to read, write or execute the contents of the file or directory.
These three triplets refer to 1) the file’s owner, 2) the group of users that the owner belongs to and 3) all users, and will only contain the values “r” (read), “w” (write), “x” (execute) or “-“ (not enabled).
These are very helpful attributes for data security, protection against malicious software, and accidental file deletions.
The entries student student respectively refer to who is the owner of the directory (or file) and to which group of users the owner belongs.
Again, this information won’t be particularly relevant to us today, but this type of information is used to control who can read and write to a file or directory.
Finally, the value 4096 is the size of the directory structure in bytes, whilst the date and time refer to when the directory was created.
Let’s look in your home directory (~).
ls -l ~
This directory should contain numerous folders.
There is a - instead of a d at the beginning of the initial string of flags indicates the difference between any files and directories.
On Ubuntu files and directories will also be displayed with different colours.
Can you see only folders, or do you have any files present in your home directory?
There are many more options that we could specify to give a slightly different output from the ls command.
Two particularly helpful ones are the options -h and -R.
We could have specified the previous command as
ls -l -h ~
The -h option will change the file size to human-readable format, whilst leaving the remainder of the output unchanged.
Try it and you will notice that where we initially saw 4096 bytes, the size is now given as 4.0K, and other file sizes will also be given in Mb etc.
This can be particularly helpful for larger files, as most files in bioinformatics are very large indeed.
An additional option -R tells the ls command to look through each directory recursively.
If we enter
ls -l -R ~
the output will be given in multiple sections.
The first is what we have seen previously, but following that will be the contents of each sub-directory.
It should become immediately clear that the output from setting this option can get very large and long depending on which directory you start from.
It’s probably not a good idea to enter ls -l -R / as this will print out the entire contents of your file system.
In the case of the ls command we can also glob all the above options together in the command
ls -lhR ~
This can often save some time, but it is worth noting that not all programmers write their commands in such a way that this convention can be followed. The built-in shell commands are usually fine with this, but many NGS data processing functions do not accept this convention.
Question
The letter l and the number 1 are often confused in text, but have different meanings. What is the difference in behaviour of ls when run with the -1 (digit) and -l (letter) options? How does ls -1 differ from ls without options?
How To Not Panic
It’s easy for things to go wrong when working in the command-line, but if you’ve accidentally:
- set something running which you need to exit or
- if you can’t see the command prompt, or
- if the terminal is not responsive
there are some simple options for stopping a process and getting you back on track. Some options to try are:
| Command | Result |
|---|---|
| Ctrl+C | Kill the current job |
| Ctrl+D | End of input |
| Ctrl+Z | Suspend current job |
Ctrl+C is usually the first port of call when things go wrong.
However, sometimes Ctrl+C doesn’t work but Ctrl+D or Ctrl+Z will. If you use Ctrl+Z you will need to terminate the process with kill %1.
Manuals and Help Pages
Accessing Manuals
In order to help us find what options are able to be specified, every command available from the shell has a manual, or a help page which can take some time to get familiar with.
These help pages are displayed using the pager known as less which essentially turns the terminal window into a text viewer so we can display text in the terminal window, but with no capacity for us to edit the text, almost like primitive version of Acrobat Reader.
To display the help page for ls enter the command
man ls
As before, the space between the arguments is important and in the first argument we are invoking the command man which then looks for the manual associated with the command ls.
To navigate through the manual page, we need to know a few shortcuts which are part of the less pager.
Although we can navigate through the less pager using up and down arrows on our keyboards, some helpful shortcuts are:
| Key | Action |
|---|---|
| Enter | go down one line |
| Spacebar | go down one page (i.e. a screenful) |
| B | go backwards one page |
| < | go to the beginning of the document |
| > | go to the end of the document |
| Q | quit |
Look through the manual page for the ls command.
Question
If we wanted to hide the group names in the long listing format, which extra options would we need set when searching our home directory?
We can also find out more about the less pager by calling it’s own man page.
Type the command:
man less
and the complete page will appear.
This can look a little overwhelming, so try pressing h which will take you to a summary of the shortcut keys within less.
There are a lot of them, so try out a few to jump through the file.
A good one to experiment with would be to search for patterns within the displayed text by prefacing the pattern with a slash (/).
Try searching for a common word like the or to to see how the function behaves, then try searching for something a bit more useful, like the word move.
Accessing Help Pages
As well as entering the command man before the name of a command you need help with, you can often just enter the name of the command with the options -h or --help specified.
Note the convention of a single hyphen which indicates an individual letter will follow, or a double-hyphen which indicates that a word will follow.
Unfortunately the methods can vary a little from command to command, so if one method doesn’t get you the manual, just try one of the others.
Sometimes it can take a little bit of looking to find something and it’s important to be realise we won’t break the computer or accidentally launch a nuclear bomb when we look around. It’s very much like picking up a piece of paper to see what’s under it. If you don’t find something at first, just keep looking and you’ll find it eventually.
Questions
Try accessing the documentation for the command man all the ways you can think of. Was there a difference in the output depending on how we asked to view the documentation? Could you access the documentation for the ls command all three ways?
Some More Useful Tricks and Commands
A series of commands to look up
So far we have explored the commands pwd, cd, ls and man as well as the pager less.
Inspect the man pages for the commands in the following table and fill in the appropriate fields.
Have a look at the useful options and try to understand what they will do if specified when invoking the command.
Write your answers on a piece of paper, or in a plain text file.
| Command | Description of function | Useful options |
|---|---|---|
man |
Display on-line manual | -k |
pwd |
Print working directory, i.e show where you are | none commonly used |
ls |
List contents of a directory | -a, -h, -l |
cd |
Change directory | (scroll down in man builtins to find cd) |
mv |
-b, -f, -u |
|
cp |
-b, -f, -u |
|
rm |
-r (careful…) |
|
mkdir |
-p |
|
cat |
||
less |
||
wc |
-l |
|
head |
-n# (e.g., -n100) |
|
tail |
-n# (e.g., -n100) |
|
echo |
-e |
|
cut |
-d, -f, -s |
|
sort |
||
uniq |
||
wget |
||
gunzip |
Putting It All Together
Now we’ve learned about a large number of commands, let’s try performing something useful. We’ll download a file from the internet, then look through the file. In each step remember to add the filename if it’s not given!
- Use the
cdcommand to make sure you are in the directoryProject_0 - Use the command
wgetto download thegfffileftp://ftp.ensembl.org/pub/release-89/gff3/drosophila_melanogaster/Drosophila_melanogaster.BDGP6.89.gff3.gz - Now unzip this file using the command
gunzip. (Hint: After typinggunzip, use tab auto-complete to add the file name.) - Change the name of the file to
dm6.gffusing the commandmv Drosophila_melanogaster.BDGP6.89.gff3 dm6.gff - Look at the first 10 lines using the
headcommand - Change this to the first 5 lines using
head -n5 - Look at the end of the file using the command
tail - Page through the file using the pager
less - Count how many lines are in the file using the command
wc -l
Output from Command Line Commands
All of the output we saw in the previous practical was ‘printed’ to your terminal.
Each function returned output to you using a data stream called standard out, or stdout for short.
Most of these tools also send information to another data stream called standard error (or stderr), and this is where many error messages go.
This is actually sent to your terminal as well, and you may have seen this if you’ve made any mistakes so far.
This basic data flow can be visualised in the following chart from www.linuxunit.com.

Note also that everything you’ve typed on your keyboard is sent to each command as a data stream called stdin.
Any guesses what that is short for?
Text In the Terminal
We can display a line of text in stdout by using the command echo.
The most simple function that people learn to write in most languages is called Hello World and we’ll do the same thing today.
echo 'Hello World'
There are a few subtleties about text which are worth noting.
If you have man pages accessible, inspect the man echo page and note the effects of the -e option. (Unfortunately you can’t access this using echo --help.)
The -e option allows you to specify tabs (\t), new lines (\n) and other special characters by using the backslash to signify these characters.
This is an important concept and the use of a backslash to escape the normal meaning of a character is very common.
Try the following three commands and see what effects these special characters have.
echo 'Hello\tWorld'
echo -e 'Hello\tWorld'
echo -e 'Hello\nWorld'
As we’ve seen above, the command echo just repeats any subsequent text.
Now enter
echo ~
Questions
Why did this happen? What happens when you execute echo ~/*? Why?
Sending Output To A File
The next part of the practical will make use of a file that you will need to download. Get the file by running the following command.
wget ftp://ftp.ensembl.org/pub/release-89/fasta/drosophila_melanogaster/ncrna/Drosophila_melanogaster.BDGP6.ncrna.fa.gz
You will need to gunzip this file too.
Using the > symbol
So far, the only output we have seen has been in the terminal (stdout).
We can redirect the output of a command to a named file instead of to standard output using the greater than symbol (>), which we can almost envisage as an arrow.
As a simple example we can write text to a file.
Using the command echo prints text to stdout
echo "Hello there"
However, we can ‘capture’ this text and redirect it to a file using the > symbol.
echo "Hello there" > hello.txt
Notice that the text no longer appeared in your terminal!
This is because we sent it to the file hello.txt.
To look at the contents of hello.txt use either one of the commands less, cat or head.
Once you’ve looked at it, delete it using the command rm to make sure you keep your folder nice and tidy, as well as free from unimportant files.
Using the >> symbol
Another alternative is to use the >> symbol, which differs from the > redirection in that it does not first delete the contents of the target file.
If one with that name already exists it appends the data from stdout to the end of the existing data within that file.
echo -e '# Sequence identifiers for all ncrna in dm6' > SeqIDs.txt
In this command, we’ve created a header for the file, and we can now add the information we need after this using the >> symbol.
This trick of writing a header at the start of a file is very common and can be used to add important information to a file.
Now let’s add another row describing where we’ve obtained the data from.
echo -e '# Obtained from ftp://ftp.ensembl.org/pub/release-89/fasta/drosophila_melanogaster/ncrna/Drosophila_melanogaster.BDGP6.ncrna.fa.gz on 2017-08-14' >> SeqIDs.txt
Have a look at the file using less
less SeqIDs.txt
Now we can add the sequence identifiers by finding lines that start with the character ‘>’.
grep -e '^>' Drosophila_melanogaster.BDGP6.ncrna.fa >> SeqIDs.txt
(You can look up grep with the man command and find what the -e option does.)
Questions
What does the '^>' mean in the grep command above?
Inspect this once again using less, head or cat
Redirection Using The Pipe Symbol
Sometimes we need to build up our series of commands and send the results of one to another.
The pipe symbol (|) is the way we do this and it can literally be taken as placing the output from one command into a pipe and redirecting it somewhere new.
This is where thinking about the output of a command as a data stream can be very helpful.
As a simple example, we could take the output from an ls command and send it to the pager less.
ls -lh /usr/bin | less
Page through the output until you get bored, then hit q to quit.
This process can also be visualised using the following diagram from Unix Bootcamp:
Inspecting genomic files using bash
As you may have realised, these file types don’t play well with MS Word, Excel and the like. We need different ways to look through these and as we go, hopefully you’ll get the hang of this. First we’ll download the file GCF_000182855.2_ASM18285v1_genomic.gff for Lactobacillus amylovorus from the NCBI database.
wget ftp://ftp.ncbi.nlm.nih.gov/genomes/all/GCF/000/182/855/GCF_000182855.2_ASM18285v1/GCF_000182855.2_ASM18285v1_genomic.gff.gz
gunzip GCF_000182855.2_ASM18285v1_genomic.gff.gz
This file is in gff format, which is very commonly used.
The first 5 lines of this file is what we refer to as a header, which contains important information about how the file was generated in a standardised format.
Many file formats have these structures at the beginning, but for our purposes today we don’t need to use any of this information so we can move on.
Have a look at the beginning of the file just to see what it looks like.
head -n12 GCF_000182855.2_ASM18285v1_genomic.gff
Notice the header lines begin with one or two hash symbols, whilst the remainder of the file contains information about the genomic features in tab-separated format. As there is a lot of information about each feature, note that each line after the header will probably wrap onto a second line in the terminal. The first feature is annotated as a region in the third field, whilst the second feature is annotated as a gene.
Question
- How many features are contained in this file?
- If we tried the following:
wc -l GCF_000182855.2_ASM18285v1_genomic.gffwould it be correct?
This will give 4446, but we know the first 5 lines are header lines. To count the non-header lines you could try several things:
grep -vc '^#' GCF_000182855.2_ASM18285v1_genomic.gff
or
grep -c '^[^#]' GCF_000182855.2_ASM18285v1_genomic.gff
Make sure you understand both of the above commands as it may not be immediately obvious!
As mentioned above, this file contains multiple features such as regions, genes, CDSs, exons or tRNAs. If we wanted to find how many regions are annotated in this file we could use the processes we’ve learned above:
grep -c 'region' GCF_000182855.2_ASM18285v1_genomic.gff
If we wanted to count how many genes are annotated, the first idea we might have would be to do something similar using a search for the pattern 'gene'.
You can see from the uses here that grep can be used for a wide variety of purposes. In general the grep command looks for patterns with a stream of data where the patter is described using a language called a regular expression (this is where the ‘re’ in grep comes from). Understanding regular expressions is very helpful, but we will leave this to be a thing that you learn as you go. You may want to read through the tutorial here and have this site in your toolbox to try out regular expressions.
Question
Do you think this is the number of regions and genes?
- Try using the above commands without the
-cto inspect the results. - Try searching for the number of coding DNA sequences using the same approach (i.e. CDS) and then add the two numbers?
- Is this more than the total number of features we found earlier?
- Can you think of a way around this using regular expressions?
Some of the occurrences of the word gene or region appear in lines which are not genes or regions. We could restrict the search to one of the tab-separated fields by including a white-space character in the search. The command:
grep -e '\sgene\s' GCF_000182855.2_ASM18285v1_genomic.gff | wc -l
will give a different result again as now we are searching for the word gene surrounded by white-space.
Note that we’ve also used the pipe here to count results using the wc command.
We could have also used grep -e with the -c flag set.
Using cut
Alternatively, there is a command cut available.
Call the manual page (man cut) and inspect the option -f.
man cut
We can simply extract the 3rd field of this tab-delimited file by using the f3 option.
cut -f3 GCF_000182855.2_ASM18285v1_genomic.gff | head -n12
(You can ignore any errors about a Broken pipe.)
However, this hasn’t cut the third field from the header rows as they are not tab-delimited.
To remove these we need to add one further option.
Call up the man page and look at the -s option.
This might seem a bit confusing, but this means don’t print lines without delimiters which would be the comment lines in this file.
cut -f3 -s GCF_000182855.2_ASM18285v1_genomic.gff | head
Now we could use our grep -e approach and we know we’re counting the correct field.
cut -f3 -s GCF_000182855.2_ASM18285v1_genomic.gff | grep -ec 'gene'
A similar question would be: How many types of features are in this file?
The commands cut, along with sort and uniq may prove to be useful when answering this
cut -f3 -s GCF_000182855.2_ASM18285v1_genomic.gff | sort | uniq -c
In the above some of the advantages of the pipe symbol can clearly be seen. Note that we haven’t edited the file on disk, we’ve just streamed the data contained in the file into various commands.
Writing Scripts
Now we’ve had a look at many of the key tools, we’ll move on to writing scripts which is one of the most common things a bioinformatician will do. We often do this on a HPC to run long data processing pipelines (or workflows).
Scripts are commonly written to perform repetitive tasks on multiple files, or need to perform complex series of tasks and writing the set of instructions as a script is a very powerful way of performing these tasks. They are also an excellent way of ensuring the commands you have used in your research are retained for future reference. Keeping copies of all electronic processes to ensure reproducibility is a very important component of any research. Writing scripts requires an understanding of several key concepts which form the foundation of much computer programming, so let’s walk our way through a few of them.
Some Important Concepts
Two of the most widely used techniques in programming are that of the for loop, and logical tests using an if statement.
for Loops
A for loop is what we use to cycle through an input one item at a time
for i in 1 2 3; do (echo "$i^2 = $(($i*$i))"); done
In the above code the fragment before the semi-colon asked the program to cycle through the values 1, 2 and 3, letting the variable i take each value in order of appearance.
- Firstly: i = 1, then i = 2 and finally i = 3.
- After that was the instruction on what to do for each value where we multiplied it by itself
$(($i*$i))to give i². We placed this as the text string ("$i^2 = $(($i*$i))") for anechocommand to return.
Note that the value of the variable i was prefaced by the dollar sign ($).
This is how the bash shell knows it is a variable, not the letter i.
The command done then finished the do command.
All commands like do, if or case have completing statements, which respectively are done, fi and esac.
An important concept which was glossed over in the previous paragraph is that of a variable.
These are just labels for a slot which can have a value that may change.
In the above loop, the same operation was performed on the variable i, but the value changed from 1 to 2 to 3.
Variables in shell scripts can hold numbers or text strings and don’t have to be formally defined as in some other languages.
We will commonly use this technique to list files in a directory, then to loop through a series of operations on each file.
There is a related construct called a while loop that continues cycling while a condition is true.
So a practical could be described in pseudo code as
while [[ ! prac_completed ]]; do work; done
This will test whether the prac is completed and only do the work if is hasn’t been (! means ‘not’).
After work is done, it loops back and checks again.
It is possible to break out of a loop earlier than the initial condition by using a break command.
This is usually done conditionally using an if statement.
if Statements
If statements are those which only have a binary yes or no response.
For example, we could specify things like:
- if (
i>1) thendosomething, or - if (
fileName == bob.txt) thendosomething else
Notice that in the second if statement, there was a double equals sign (==).
This is the means compare the first argument with the second argument.
This differs from a single equals sign which is commonly used to assign the first argument to be what is given in the second argument.
This use of double operators is very common, notably you will see && to represent the command and, and || to represent or.
A final useful trick to be aware of is the use of an exclamation mark to reverse a command.
A good example of this is the use of the command != as the representation of not equal to in a logical test (again the ! means ‘not’).
Shell Scripts
Now that we’ve been through just some of the concepts and tools we can use when writing scripts, it’s time to tackle one of our own where we can bring it all together.
Every bash shell script begins with what is known as a shebang, which we would commonly recognise as a hash sign followed by an exclamation mark, i.e #!.
This is immediately followed by /bin/bash, which tells the interpreter to run the command bash in the directory /bin.
This opening sequence is vital and tells the computer how to respond to all of the following commands.
As a string this looks like:
#!/bin/bash
The hash symbol generally functions as a comment character in scripts. Sometimes we can include lines in a script to remind ourselves what we’re trying to do, and we can preface these with the hash to ensure the interpreter doesn’t try to run them. It’s presence as a comment here, followed by the exclamation mark, is specifically looked for by the program loader but beyond this specific occurrence, comment lines are ignored in scripts and programs.
An Example Script
Let’s now look at some simple scripts. These are really just examples of some useful things you can do and may not really be the best scripts from a technical perspective. Hopefully they give you some pointers so you can get going
Don’t try to enter these commands directly in the terminal!!! They are intended to be placed in a script which we will do after we’ve inspected the contents of the script (see next page). First, let’s just have a look through the script and make sure we understand what the script is doing.
#!/bin/bash

# First we'll declare some variables with some text strings
ME='Put your name here'
MESSAGE='This is your first script'

# Now well place these variables into a command to get some output
echo -e "Hello ${ME}\n${MESSAGE}\nWell Done!"
- You may notice some lines that begin with the
#character. These are comments which have no impact on the execution of the script, but are written so you can understand what you were thinking when you wrote it. If you look at your code 6 months from now, there is a very strong chance that you won’t recall exactly what you were thinking, so these comments can be a good place just to explain something to the future version of yourself. There is a school of thought which says that you write code primarily for humans to read, not for the computer to understand. - Another coding style which can be helpful is the enclosing of each variable name in curly braces every time the value is called, e.g.
${ME}Whilst not being strictly required, this can make it easy for you to follow in the future when you’re looking back. - Variables have also been named using strictly upper-case letters. This is another optional coding style, but can also make things clear for you as you look back through your work. Most command line tools use strictly lower-case names, so this is another reason the upper-case variable names can be helpful.
Question
In the above script, there are two variables. Although we have initially set them to be one value, they are still variables. What are their names?
Writing and Executing Our First Script
Let’s create an empty file which will become our script.
We’ll give it the suffix .sh as that is the common convention for bash scripts.
Make sure you’re in the Project_0 folder, then enter:
touch wellDone.sh
Now open this using the using the text editor nano:
nano wellDone.sh
Enter the above code into this file setting your actual name as the ME variable, and save it by using Ctrl+O (indicated as ^O) in the nano screen.
Once you’re finished, you can exit the nano editor by hitting Ctrl+X (written as ^X).
Assuming that you’ve entered everything correctly, we can now execute this script by simply entering
bash wellDone.sh
Setting File Permissions
Unfortunately, this script cannot be executed without calling bash explicitly but we can also enable execution of the file directly by setting the execute flag in the file permissions.
First let’s look at what permissions we have:
ls -lh *.sh
You should see output similar to this:
-rw-rw-r-- 1 student student 247 Aug 14 14:48 wellDone.sh
- Note how the first entry is a dash (
-) indicating this is a file. - Next come the three Read/Write/Execute triplets which are
rw-followed byrw-andr--
Question
Interpret the final triplet? What are these permissions indicating, and for whom?
As you can see, the x flag has not been set in any of the triplets, so this file is not executable as a script yet.
To do this, we simply need to set the x flag, then we’ll look again using long-listing format.
chmod +x wellDone.sh
ls -lh *.sh
Note how the file now has the x flag set for every user, which means every user can execute this script.
Now we can execute the script by calling it using the file path.
One of the settings in bash though won’t allow you to execute the file from the same folder, so we need to add the ./ prefix to the script.
./wellDone.sh
We can set each of these flags for all triplets using + to turn the flag on, or - to turn the flag off.
If we wanted to remove write permissions for all users we could simply use the command:
chmod -w wellDone.sh
ls -lh *.sh
This can be a very useful trick for write-protecting files!
These flags actually represent binary bits that are either on or off. Reading from right to left:
- the first bit is the execute flag, which has value 1
- the second bit is the write flag, which has the value 2
- the third bit is the read flag, which has the value 4
Thus each combination of flags can be represented by a single integer, as shown in the following table:
| Value | Binary | Flags | Meaning |
|---|---|---|---|
| 0 | 000 |
--- |
No read, no write, no execute |
| 1 | 001 |
--x |
No read, no write, execute |
| 2 | 010 |
-w- |
No read, write, no execute |
| 3 | 011 |
-wx |
No read, write, execute |
| 4 | 100 |
r-- |
Read, no write, no execute |
| 5 | 101 |
r-x |
Read, no write, execute |
| 6 | 110 |
rw- |
Read, write, no execute |
| 7 | 111 |
rwx |
Read, write, execute |
We can now set permissions using a 3-digit code, where 1) the first digit represents the file owner, 2) the second digit represents the group permissions and 3) the third digit represents all remaining users.
To set the permissions for our script to read-write-executefor you and any other users in the group you belong to, we could now use
chmod 774 wellDone.sh
ls -lh *sh
Question
What will the final 4 in the above settings do?
Modifying our script
In the initial script we used two variables ${ME} and ${MESSAGE}.
Now let’s change the variable ${ME} in the script to read as ME=$1.
First we’ll create a copy of the script to edit, and then we’ll edit using nano
cp wellDone.sh wellDone2.sh
nano wellDone2.sh
This time we have set the script to receive input from stdin (i.e. the keyboard), and we will need to supply a value, which will then be placed in the variable ${ME}.
Choose whichever random name you want (or just use “Boris” as in the example) and enter the following
./wellDone2.sh Boris
As you can imagine, this style of scripting can be useful for iterating over multiple objects. A trivial example, which builds on a now familiar concept would be to try the following.
for n in Boris Fred; do (./wellDone2.sh ${n}); done
As a good example, this script could summarise key features in a file.
Then we could simply pass the script multiple files using this strategy, and write the output to another file using the > symbol.
Using for Loops
Here’s an example of a script which uses a for loop.
#!/bin/bash

FILES=$(ls)

COUNT=0
for f in ${FILES}; do
	((COUNT++))
	ln=$(wc -l ${f} | cut -f 1 -d ' ')
	echo "File number ${COUNT} (${f}) has ${ln} lines"
done
Task
Save this as a script in the Project_0 folder called lineCount.sh.
Add comments where you think you need them to make sure you understand what’s happening.